
Publishing NuGet packages from a Github Action without secrets
This guide will walk you through using a combination of GitHub actions and NuGet publishing policies to push packages to nuget.org from within an action without needing to worry about API keys.
Now you have a GitHub Action configured to sign your code and your nupkgs you can take it a little further and publish to nuget.org without the need to create, rotate and otherwise manage API keys.
NuGet has an implementation of Trusted Publishing, an OpenSSF concept for improving supply change security by removing the need for a long-lived API token to publish to package repositories.
This works by allowing a GitHub action t0 authenticate to nuget.org via OIDC, and to exchange that authentication token for a short-lived API key which can then be used to publish packages.
Like an Azure Managed Identity's federated credentials the NuGet OIDC login is restricted to known GitHub repositories, workflows and, optionally, actions environments, wrapped up as a trusted publishing policy.
If you have already looked at the GitHub actions I use for producing my idunno.Authentication NuGet packages you may have noticed the publish stage in release.yml which authenticates to nuget.org and the publishes the signed packages.
Prerequisites
You should already have
- A GitHub account and admin rights on the repository you want to configure the actions on.
- A nuget.org account to which you publish packages.
Configuration values you will need
| Configuration | Where to find it |
|---|---|
| GitHub Repository Owner | The first path segment in the URI for the repository you want to assign managed identities to. e.g. for https://github.com/contoso/WebSite/ the owner is contoso |
| GitHub Repository Name | The second path segment in the URI for the repository you want to assign managed identities to. e.g. for https://github.com/contoso/WebSite/ the Repository Name is WebSite |
| GitHub Workflow File | The name of your workflow file, available in your repository in the .github/workflows directory . Do not include the path.e.g. for https://github.com/contoso/packages/.github/workflows/publish.yml the filename is publish.yml |
| (Optionally) GitHub Actions Environment | Available in the repository settings on GitHub if you have configured environments for your workflows. |
| NuGet User Name | Available after you log in to https://nuget.org in the right side of the NuGet.org menu. It is not the email address you log in with. |
Defining a NuGet publishing policy
Much like defining a federated credential for an Azure Managed Identity Trusted Publishing NuGet configuration is based off the Repository Owner and Repository Name of the repository you want to authenticate from. NuGet also requires the workflow file, whilst environments are optional (although I'd recommend using actions environments, as their use allows you to tightly control which steps in your build have the ability to publish). All of this is wrapped up in a publishing policy.
To define a publishing policy
- Open nuget.org and log in.
- Click the username of your account to pull down the account menu and choose Trusted Publishing.
- Click + Create.
- Fill out the policy definition. Everything except Policy Name is case sensitive.
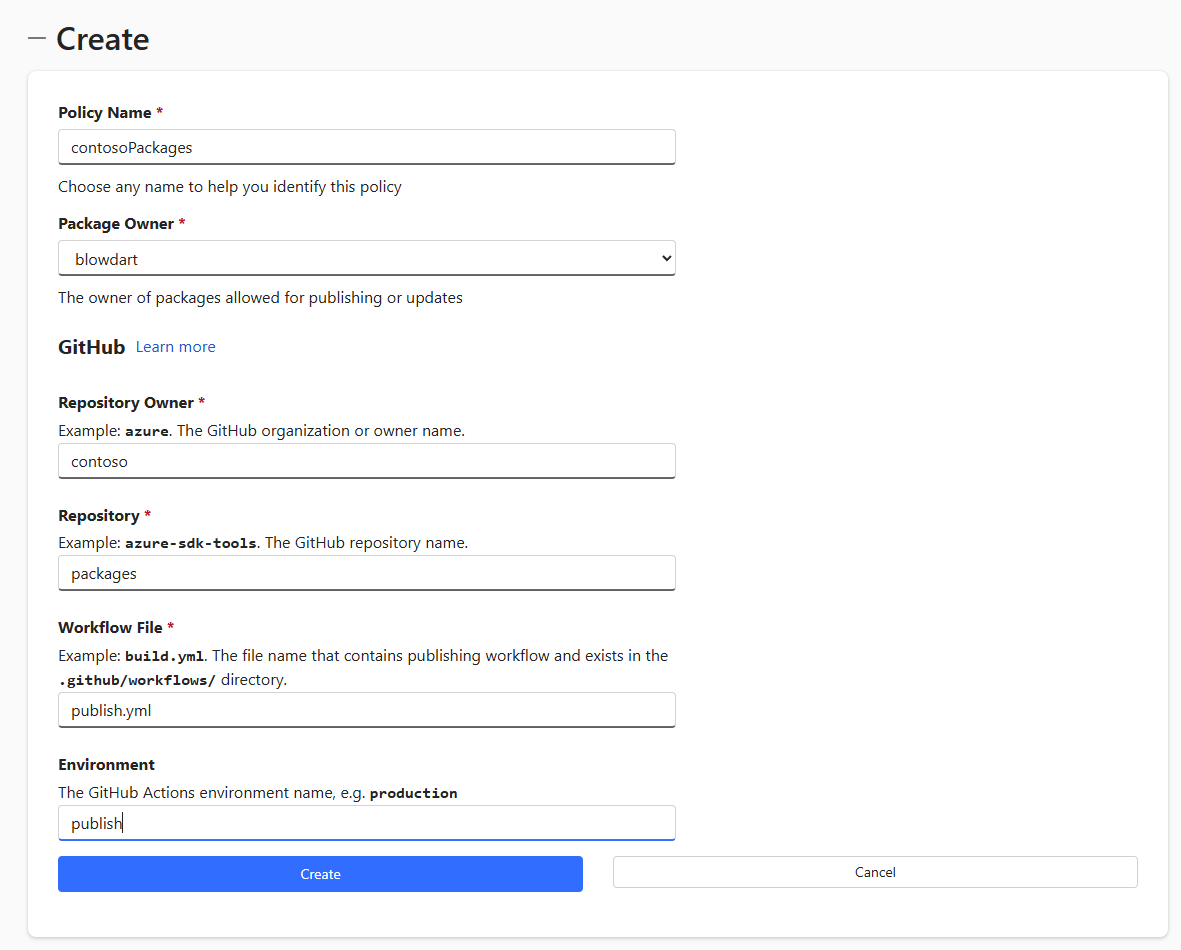
- Click Create.
Why is my policy pending?
When you create a publishing policy you may see a warning in the Policy Management page, "ℹ️ Use within 7 day(s) to keep it permanently active". Why does NuGet do this?
Until you publish from GitHub NuGet doesn't know the unique repository and owner IDs, only the strings you entered in the policy. Without knowing the underlying IDs if someone deleted a repo, then recreated it with the same name they could still publish, even though the repo contents could have massively changed. This type of exploit is known as a "resurrection attack". The 7-day window narrows the exploitability, so if you want the policy to stick, publish a package from the action within the 7 days.
NuGet Publishing from a GitHub Action
If you have chosen to limit the publish capability to a specific environment first complete the following steps if the environment is an environment that does not, as yet exist.
Configuring the GitHub Action
- Log in to GitHub.
- Choose the repository you want to add the signing action to by navigating to it.
- From the repository view select Settings.
- Select Environments from the left-hand menu.
- Select New environment, then give it the same name as the environment you entered when you created the Trusted Publishing policy on nuget.org.
- Set the protection rules for the environment to whatever policy you require. Personally, I require reviewers for both signing and publishing stages, which means an approval step needs to take place, as well as only allowing signing and publishing to run from the main branch, where I generate new releases from.
Now we need to configure a single secret.
- If you are limiting the policy to an environment, choose the environment from the Environments page. Click Add Environment Secret, or
- If you are not using environments, bring up the Settings page for your repository, click Secrets and variables in the left-hand menu. Click Actions then click New Repository Secret.
- Create a new secret with a secret name of NUGET_USERNAME and enter your NuGet username as the secret value, then click Add Secret.
Adding a publish stage to your action
As you may have read in .NET code & nupkg signing in GitHub Actions I use a staged process in my release and pre-release actions, Build (and test), Sign, and now I will add a third stage Publish. I use stages because it isolates the release of secrets to only the secrets each stage requires, using the environment the stage is configured to use.
The following yaml snippet builds on the code signing action example to add a publish stage, which takes the output of the sign stage, the signed nupkgs, authenticates to NuGet using the publisher policy, and the publishes the packages, all without needing an API key.
  publish:
    name: Publish
    needs: sign
    runs-on: ubuntu-latest
    environment: publish
    if:  ${{ inputs.perform_publish }}
    permissions:
      id-token: write

    - name: 'Setup .NET SDK'
      uses: actions/setup-dotnet

    - name: 'Gather nupkgs from sign output'
      uses: actions/download-artifactv6.0.0
      with:
        name: signed-artifacts
        path : ${{ env.OUTPUT_DIRECTORY }}

    - name: Authenticate to nuget
      uses: NuGet/login
      id: nugetlogin
      with:
        user: ${{secrets.NUGET_USERNAME}}

    - name: Publish NuGet packages
      shell: pwsh
      run: >
        foreach($file in (Get-ChildItem "${env:NUPKG_DIRECTORY}" -Recurse -Filter *.nupkg)) {
          dotnet nuget push $file --api-key "${{ steps.nugetlogin.outputs.NUGET_API_KEY }}" --source https://api.nuget.org/v3/index.json
        }
The short-lived publishing API key is produced in the output of NuGet/login action and is used subsequently in publish as the --api-key parameter value in dotnet nuget push.
As before in .NET code & nupkg signing in GitHub Actions I have omitted the action hashes in the example to make things easier to read, but as you write your own workflow you should pin each action to its version hash to avoid the potential harm that could be caused by an attacker gaining control of an action, injecting malicious code and then retagging the version of the action containing the code to an existing version tag.
In conclusion
Now you have all the tools you need to remove your NuGet publishing API keys from your GitHub actions, increasing security as there are no API keys to leak, and reliability of your publishing as there are no API keys to rotate on expiration.